0%

目前还没有完全确认使用的正确性,使用OpenCL的推理速度远慢于CPU的推理速度

D4: RK3399上MNN的OpenCL推理

1. MNN的OpenCL支持

可以在CMakeLists.txt里直接修改,打开OpenCL支持

1
2
3
4
5
6
7
8
9
10
11
# backend options
option(MNN_METAL "Enable Metal" OFF)
option(MNN_OPENCL "Enable OpenCL" ON)
option(MNN_OPENGL "Enable OpenGL" OFF)
option(MNN_VULKAN "Enable Vulkan" OFF)
option(MNN_ARM82 "Enable ARM82" OFF)
option(MNN_ONEDNN "Enable oneDNN" OFF)
option(MNN_AVX512 "Enable AVX512" OFF)
option(MNN_CUDA "Enable CUDA" OFF)
option(MNN_TENSORRT "Enable TensorRT" OFF)
option(MNN_COREML "Enable CoreML" OFF)

如果是交叉编译,为了方便起见,关闭MNN_USE_SYSTEM_LIB不使用系统中的依赖库

1
2
# build options
option(MNN_USE_SYSTEM_LIB "For opencl and vulkan, use system lib or use dlopen" OFF)

编译后会生成libMNN_CL.so库。

2. MNN推理配置

在创建会话的时候,通过修改配置,让MNN使用OpenCL进行推理。

1
2
3
4
std::shared_ptr<MNN::Interpreter> net(MNN::Interpreter::createFromFile(_param_path.c_str()));
MNN::ScheduleConfig config;
config.type = MNN_FORWARD_OPENCL;
session = net->createSession(config);

3. 主函数修改

为了能够正确调用OpenCL,需要在main函数中手动加载libMNN_CL.so库。否则MNN会报错找不到OpenCL backend。

1
2
3
4
5
6
#include <dlfcn.h>
int main(int argc, char *argv[])
{
dlopen("libMNN_CL.so", RTLD_NOW);
...
}

踩了两个坑,一个是MNN的交叉编译,一个是OpenCV的编译。编译方法都很直接,主要记录一下坑吧。

D3: MNN和OpenCV编译

1. MNN的交叉编译

其实直接参照MNN文档的示例,就可以编译完成。

1
2
3
4
5
6
7
8
9
export cross_compile_toolchain=linaro/aarch64
mkdir build && cd build
cmake .. \
-DCMAKE_SYSTEM_NAME=Linux \
-DCMAKE_SYSTEM_VERSION=1 \
-DCMAKE_SYSTEM_PROCESSOR=aarch64 \
-DCMAKE_C_COMPILER=$cross_compile_toolchain/bin/aarch64-linux-gnu-gcc \
-DCMAKE_CXX_COMPILER=$cross_compile_toolchain/bin/aarch64-linux-gnu-g++
make -j4

最开始编译的时候遇到了一个类型转换的问题

1
2
3
4
5
6
7
8
9
10
11
12
13
14
15
16
17
18
19
20
21
22
23
[ 36%] Built target MNNTransform
[ 36%] Built target MNNUtils
[ 36%] Building CXX object CMakeFiles/MNNCPU.dir/source/backend/cpu/compute/WinogradInt8Helper.cpp.o
/data/mnn/source/backend/cpu/compute/WinogradInt8Helper.cpp: In function 'void MNN::TRANS_4x4(MNN::VecType&, MNN::VecType&, MNN::VecType&, MNN::VecType&)':
/data/mnn/source/backend/cpu/compute/WinogradInt8Helper.cpp:39:48: note: use -flax-vector-conversions to permit conversions between vectors with differing element types or numbers of subparts
auto m0 = vtrn1q_s32(vec0.value, vec1.value), m1 = vtrn2q_s32(vec0.value, vec1.value);
^
/data/mnn/source/backend/cpu/compute/WinogradInt8Helper.cpp:39:48: error: cannot convert 'int8x16_t {aka __vector(16) signed char}' to 'int32x4_t {aka __vector(4) int}' for argument '1' to 'int32x4_t vtrn1q_s32(int32x4_t, int32x4_t)'
/data/mnn/source/backend/cpu/compute/WinogradInt8Helper.cpp:40:48: error: cannot convert 'int8x16_t {aka __vector(16) signed char}' to 'int32x4_t {aka __vector(4) int}' for argument '1' to 'int32x4_t vtrn1q_s32(int32x4_t, int32x4_t)'
auto m2 = vtrn1q_s32(vec2.value, vec3.value), m3 = vtrn2q_s32(vec2.value, vec3.value);
^
/data/mnn/source/backend/cpu/compute/WinogradInt8Helper.cpp:42:29: error: 'm1' was not declared in this scope
vec1.value = vtrn1q_s64(m1, m3);
^~
/data/mnn/source/backend/cpu/compute/WinogradInt8Helper.cpp:42:33: error: 'm3' was not declared in this scope
vec1.value = vtrn1q_s64(m1, m3);
^~
CMakeFiles/MNNCPU.dir/build.make:2054: recipe for target 'CMakeFiles/MNNCPU.dir/source/backend/cpu/compute/WinogradInt8Helper.cpp.o' failed
make[2]: *** [CMakeFiles/MNNCPU.dir/source/backend/cpu/compute/WinogradInt8Helper.cpp.o] Error 1
CMakeFiles/Makefile2:141: recipe for target 'CMakeFiles/MNNCPU.dir/all' failed
make[1]: *** [CMakeFiles/MNNCPU.dir/all] Error 2
Makefile:129: recipe for target 'all' failed
make: *** [all] Error 2

参考官方github上的#1560即可解决。

2. OpenCV编译

其实没啥好说的,主要是有些组件需要在线拉取,国内这个网络环境实在是令人无语,花了几个美元租了国外的云服务,直接编译就可以。编译方法参考官方教程即可。

本来以为可以很顺利地开始玩耍了,结果只把开发环境搭建成功了,交叉编译MNN失败:(

D2: 开发环境搭建

因为是为了兴趣而做的小开发,平时又太忙,基本都是零碎时间来敲代码,所以目标是在平时办公的装Windows10的笔记本上搭建开发环境,如果是Linux应该会方便很多。

1. 启动WSL2

开启虚拟机平台

用管理员权限打开PowerShell,运行以下命令。或者新建WSL2.bat脚本,以管理员权限运行。

1
dism.exe /online /enable-feature /featurename:VirtualMachinePlatform /all /norestart

安装WSL2内核

下载WSL2内核更新包,相关说明可以查阅微软的文档

重启系统后,用管理员权限打开PowerShell,运行以下命令,将WSL2设置为默认版本

1
wsl --set-default-version 2

2. 安装DOCKER

安装

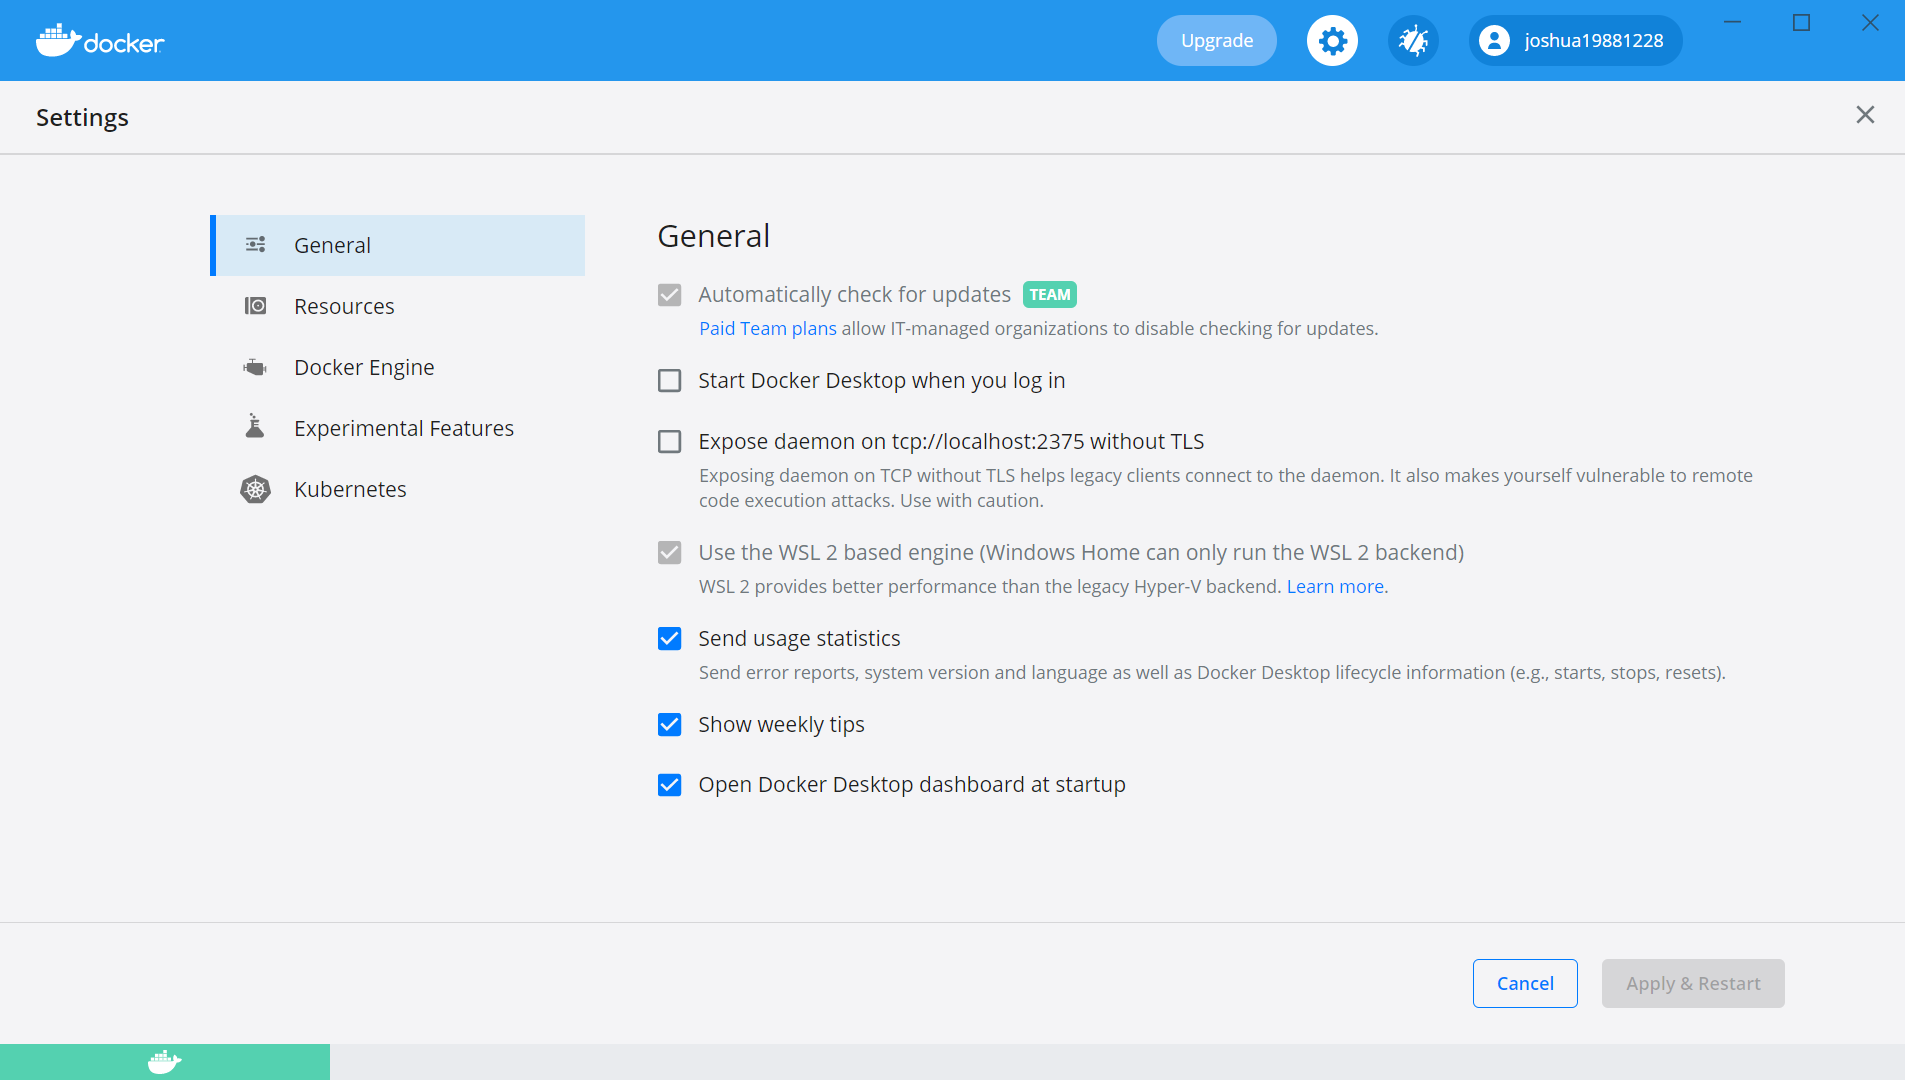
我安装的是Docker Desktop 3.5.1,直接下载安装即可,注意勾选“Use WSL 2 based engine”选项。我的系统是家庭版,默认勾选此选项。

Docker Desktop

修改镜像存储位置(可选操作)

由于系统盘空间有限,将Docker的默认根目录调整到数据盘。

  1. 退出Docker Desktop

  2. 确认所有WSL应用已退出,所有应用都应该是stop状态

    1
    wsl --list -v
  3. 迁移docker-desktop

    1
    2
    3
    wsl --export docker-desktop "D:\DOCKER-ENGINE\docker-desktop.tar"
    wsl --unregister docker-desktop
    wsl --import docker-desktop D:\DOCKER-ENGINE\run "D:\DOCKER-ENGINE\docker-desktop.tar" --version 2
  4. 迁移docker-desktop-data

    1
    2
    3
    wsl --export docker-desktop-data "D:\DOCKER-ENGINE\docker-desktop-data.tar"
    wsl --unregister docker-desktop-data
    wsl --import docker-desktop-data D:\DOCKER-ENGINE\data "D:\DOCKER-ENGINE\docker-desktop-data.tar" --version 2

3. 使用Ubuntu 18.04镜像建立开发容器

建立基础容器

  1. Docker Hub上直接拉取镜像

    1
    docker pull ubuntu:18.04
  2. 启动容器

    1
    docker run -it -v D:\DOCKER-SHARE:\data --name toy-project ubuntu:18.04 bash

基础环境安装

  1. 更新源

    1
    apt-install update
  2. 安装开发基础库

    1
    apt-get install repo git-core gitk git-gui gcc-arm-linux-gnueabihf u-boot-tools device-tree-compiler gcc-aarch64-linux-gnu mtools parted libudev-dev libusb-1.0-0-dev python-linaro-image-tools linaro-image-tools gcc-arm-linux-gnueabihf libssl-dev liblz4-tool genext2fs lib32stdc++6 gcc-aarch64-linux-gnu g+conf autotools-dev libsigsegv2 m4 intltool libdrm-dev curl sed make binutils build-essential gcc g++ bash patch gzip bzip2 perl tar cpio python unzip rsync file bc wget libncurses5 libqt4-dev libglib2.0-dev libgtk2.0-dev libglade2-dev cvs git mercurial rsync openssh-client subversion asciidoc w3m dblatex graphviz python-matplotlib libssl-dev texinfo fakeroot libparse-yapp-perl default-jre patchutils lib32gcc-7-dev g++-7 libstdc++-7-dev
  3. 使用交叉编译工具链

    下载工具链,我用的是Linaro工具链,按常规方式编译程序,例如MNN的示例是

    1
    2
    3
    4
    5
    6
    7
    8
    9
    export cross_compile_toolchain=linaro/aarch64
    mkdir build && cd build
    cmake .. \
    -DCMAKE_SYSTEM_NAME=Linux \
    -DCMAKE_SYSTEM_VERSION=1 \
    -DCMAKE_SYSTEM_PROCESSOR=aarch64 \
    -DCMAKE_C_COMPILER=$cross_compile_toolchain/bin/aarch64-linux-gnu-gcc \
    -DCMAKE_CXX_COMPILER=$cross_compile_toolchain/bin/aarch64-linux-gnu-g++
    make -j4

离开一线技术研发有点久了,最近一直在做偏市场和研发管理的角色。总觉得应该稍微调整一下,听从一个前辈的建议:每天都做一点自己感兴趣的小项目,让自己对技术保持嗅觉。因此,打算鼓捣鼓捣点RK3399Pro上的小东西。

D1: RK3399Pro操作系统Ubuntu安装

我购买的是Firefly RK3399Pro JD4开发板,配有核心板和底板。商家还贴心的给了一个U盘,内有各种工具和文档。因为我自己不会安装开发,第一件事就是把板子的系统重新烧成Ubuntu18.04。

0. 连接开发板

开发板上电,通过USB口连接PC主机。

1. 安装USB驱动助手

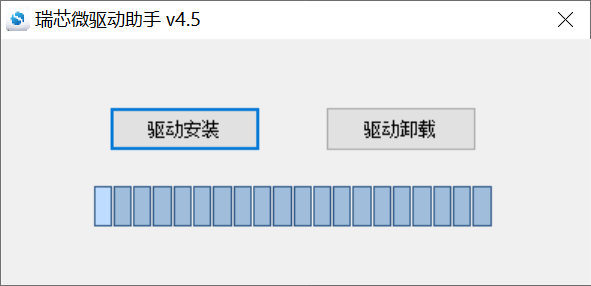
在PC主机上直接打开“DriverInstall.exe”,安装USB驱动

安装驱动

2. 烧录系统

首先,准备好固件镜像。例如我选用的是“AIO-RK3399PRO-JD4-Ubuntu_18.04.5_LTS_DESKTOP_PYTHON3.5-RKNN-OPENCV-20210413-1746.img”,基本的环境都已经安装后,后续使用比较方便。如果需要做极致优化,再考虑手动编译内核和库的安装。

其次,烧系统。使用“AndroidTool.exe”进行固件烧录,虽然叫AndroidTool,但是也可以烧录Ubuntu系统。在“Update Firmware”标签页中,点击“Firmware”选择上述固件路径。

最后,注意连接开发板。按住开发板上的Recovery键,轻按Reset键,直到烧录工具显示“Found One LOADER Device”,松开按键。点击Upgrade开始烧录。烧录进度完成后,重启连接屏幕,即可进入Ubuntu桌面系统。

烧录系统

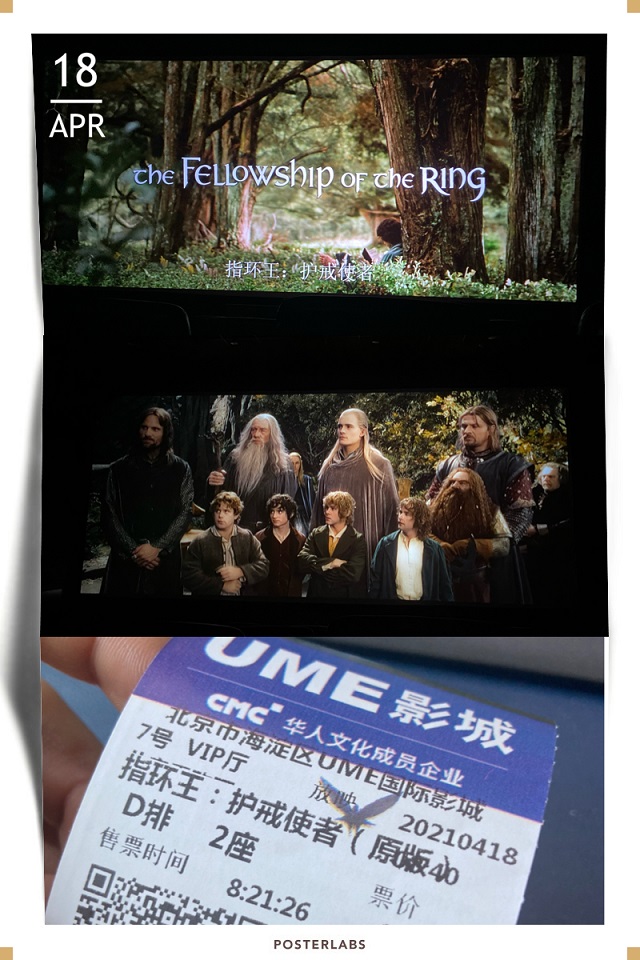
“I wish it need not have happened in my time,” said Frodo.

“So do I,H said Gandalf, “and so do all who live to see such times. But that is not for them to decide. All we have to decide is what to do with the time that is given us.”

The Fellowship of the Ring

It’s great to see the movie in cinema again.

说起做汇报,我总有点发愁。

先得苦苦思索一个大纲,这报告是什么场合,目的是什么,先讲这个还是先讲那个。要是对方是个外行,不关心技术还好,如果非要了解技术实现过程,还得从技术原理讲起,讲技术原理实现路径明确了,可是大的逻辑又混乱了。

然后费劲吧啦做PPT,按道理有了大纲,做起来好像也不难,但是边做边找素材就又费体力脑力了,这个图不好看,那个图不合心意。一会儿上网搜一搜,一会儿自己画。除了素材不好找,做出来还得美观好看,字体字号是不是统一了,图文是不是平衡了,一大片空白总得填上些什么吧,一大段字谁会去读。做上这一页最少也得十分钟!

最后就是汇报现场,纯粹的技术汇报我还是有信心的,当然前提是自己的技术过关熟悉,要是做的不好或者有不熟悉的地方,心里总要打鼓的。另一种纯粹是为了商务开拓的话,就几本会战战栗栗、口干舌燥,最后搞一个大红脸。要是再分析个市场前景、未来规模什么的,那只能是邯郸学步,赶紧说完赶紧解脱。

发愁归发愁,该汇报还要汇报,硬着头皮来吧!

Spring, the sweet spring

BY THOMAS NASHE

Spring, the sweet spring, is the year’s pleasant king,
Then blooms each thing, then maids dance in a ring,
Cold doth not sting, the pretty birds do sing:
Cuckoo, jug-jug, pu-we, to-witta-woo!

The palm and may make country houses gay,
Lambs frisk and play, the shepherds pipe all day,
And we hear aye birds tune this merry lay:
Cuckoo, jug-jug, pu-we, to-witta-woo!

The fields breathe sweet, the daisies kiss our feet,
Young lovers meet, old wives a-sunning sit,
In every street these tunes our ears do greet:
Cuckoo, jug-jug, pu-we, to witta-woo!

Spring, the sweet spring!

2021.04.04

TITLE: Destruction and Construction Learning for Fine-grained Image Recognition

AUTHOR: Yue Chen, Yalong Bai, Wei Zhang, Tao Mei

ASSOCIATION: JD AI Research

FROM: arXiv:2003.14142

CONTRIBUTION

  1. A novel “Destruction and Construction Learning (DCL)” framework is proposed for fine-grained recognition.For destruction, the region confusion mechanism (RCM) forces the classification network to learn from discriminative regions, and the adversarial loss prevents over-fitting the RCM-induced noisy patterns. For construction, the region alignment network re- stores the original region layout by modeling the semantic correlation among regions.
  2. State-of-the-art performances are reported on three standard benchmark datasets, where DCL consistently outperforms existing methods.
  3. Compared to existing methods, proposed DCL does not need extra part/object annotation and introduces no computational overhead at inference time.

METHOD

The proposed method consists of four parts as the following figure shows.

Framework

At training stage, three losses are used, including classification loss, adversarial loss and region alignment loss. The loss can be defined as

The three losses play different roles in this work.

Classification Network

At inference stage, only this part of the network is used. And this part introduces the classification loss $L_{cls}$.

Region Confuston Mechanism

Given an input image, the image is first uniformly partioned into $N \times N$ sub-regions. Then the sub-regions are rearranged whithin neighbourhood. This shuffling method destructs the global structure and ensures that the local region jitters inside its neighbourhood with a tunable size. Since the global structure has been destructed, to recognize these randomly shuffled images, the classification network has to find the discriminative regions and learn the delicate differences among categories.

Adversarial Learning Network

Destructing images with RCM does not always bring beneficial information for fine-grained classification. Features learned from these noise visual patterns are harmful to the classification task. Thus adversarial loss $L_{adv}$ is introduced to prevent such overfitting. This loss helps the filters to response differently on original images and region-shuffled images. Thus the network can work reliabally.

Region Alignment Network

The direct aim of the Region Alignment Network is to restore the original image from the scattered image. By end-to-end training, the region alignment loss $L_{loc}$ can help the classification backbone network to build deep understanding about objects and model the structure information, such as the shape of objects and semantic correlation among parts of object.

PERFORMANCE

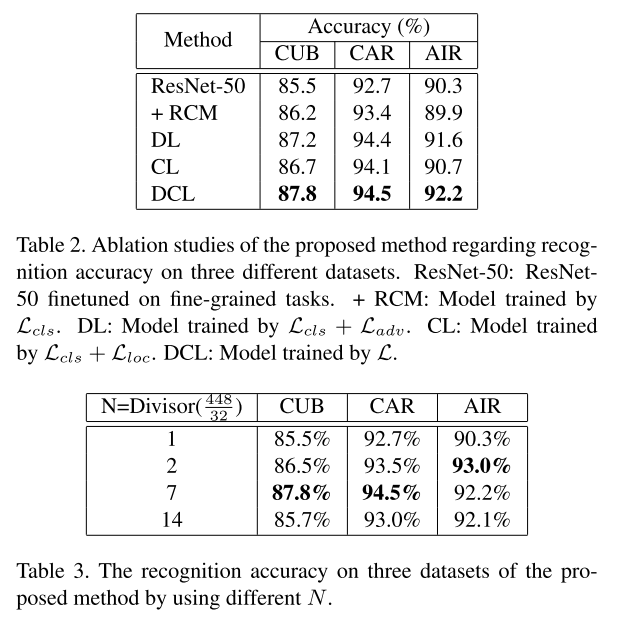
The following table shows the comparison between this work and prior work.

performance

ablation

TITLE: Weakly Supervised Attention Pyramid Convolutional Neural Network for Fine-Grained Visual Classification

AUTHOR: Yifeng Ding, Shaoguo Wen, Jiyang Xie, Dongliang Chang, Zhanyu Ma, Zhongwei Si, Haibin Ling

ASSOCIATION: Beijing University of Posts and Telecommunications, Stony Brook University

FROM: arXiv:2002.03353

CONTRIBUTION

  1. A novel attention pyramid convolutional neural network (AP-CNN) is propsed by building an enhanced pyramidal hierarchy, which combines a top-down pathway of features and a bottom-up pathway of attentions, and thus learns both high-level semantic and low-level detailed feature representations.
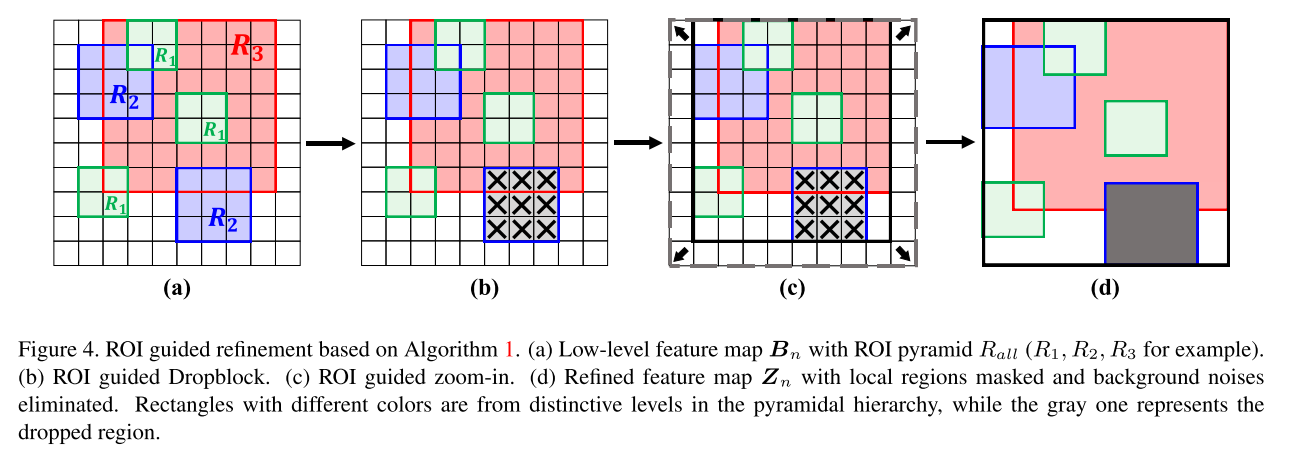
  2. ROI guided refinement is proposed which consists of ROI guided dropblock and ROI guided zoom-in to further refine the features. The dropblock operation helps to locate more discriminative local regions, and the zoom-in operation aligns features with background noises eliminated.

METHOD

AP-CNN is a two-stage network, raw-stage and refined-stage, that respectively takes coarse full images and refined features as input. An overview of the proposed AP-CNN is illustrated in the following figure.

Overview

First, the feature and attention pyramid structure takes coarse images as input, which generates the pyramidal features and the pyramidal attentions by establishing hierarchy on the basic CNN following a top-down feature pathway and a bottom-up attention pathway.

Second, once the spatial attention pyramid has been obtained from the raw input, the region proposal network (RPN) proceeds to generate the pyramidal regions of interest (ROIs) in a weakly supervised way. Then the ROI guided refinement is conducted on low-level features with a) the ROI guided dropblock which erases the most discriminative regions selected from small-scaled ROIs, and b) the ROI guided zoom-in which locates the major regions merged from all ROIs.

Third, the refined features are sent into the refined-stage to distill more discriminative information. Both stages set individual classifiers for each pyramid level, and the final classification result is averaged over the raw-stage predictions and the refined-stage predictions.

The Attention Pyramid consists of two types of attentions, Spatial Attention and Channel Attention. The following figure shows the data-flow.

attention

Spatial Attention Pyramid is a set of feature maps of different resolutions and is generated from feature pyramid. Then ROI pyramid is generated from the spatial activations using RPN. At training stage, a ROI is selected to be droped, erasing the informative part and encouraging the network to find more discriminative regions. At testing stage, this operation is skipped. The following figure shows the ROI guided refinement.
roi_dropblock

PERFORMANCE

The following table shows the comparison between this work and prior work.

performance