
Every coder will feel something seeing this :)

Every coder will feel something seeing this :)
TITLE: DetNet: A Backbone network for Object Detection
AUTHOR: Xuepeng Shi, Shiguang Shan, Meina Kan, Shuzhe Wu, Xilin Chen
ASSOCIATION: Tsinghua University, Face++
FROM: arXiv:1804.06215
There are two problems using the classification backbone for object detection tasks. (i) Recent detectors, e.g., FPN, involve extra stages compared with the backbone network for ImageNet classification in order to detect objects with various sizes. (ii) Traditional backbone produces higher receptive field based on large downsampling factor, which is beneficial to the visual classification. However, the spatial resolution is compromised which will fail to accurately localize the large objects and recognize the small objects.
To sumarize, there are 3 main problems to use current pre-trained models, including
To address these problems, DetNet has following characteristics. (i) The number of stages is directly designed for Object Detection. (ii) Even though more stages are involved, high spatial resolution of the feature maps is mainted, while keeping large receptive field using dilated convolution.
The main architecture of DetNet is designed based on ResNet-50. The first 4 stages are kept same with ResNet-50. The main differences are illustrated as follows:
The following figure shows the dialted bottleneck with $1 \times 1$ conv projection and the architecture of DetNet.


TITLE: Real-Time Rotation-Invariant Face Detection with Progressive Calibration Networks
AUTHOR: Xuepeng Shi, Shiguang Shan, Meina Kan, Shuzhe Wu, Xilin Chen
ASSOCIATION: Chinese Academy of Sciences
FROM: arXiv:1804.06039
Given an image, all face candidates are obtained according to the sliding window and image pyramid principle, and each candidate window goes through the detector stage by stage. In each stage of PCN, the detector simultaneously rejects most candidates with low face confidences, regresses the bounding boxes of remaining face candidates, and calibrates the RIP orientations of the face candidates. After each stage, non-maximum suppression (NMS) is used to merge those highly overlapped candidates.
PCN progressively calibrates the RIP orientation of each face candidate to upright for better distinguishing faces from non-faces.
The following figure illustrates the framework.
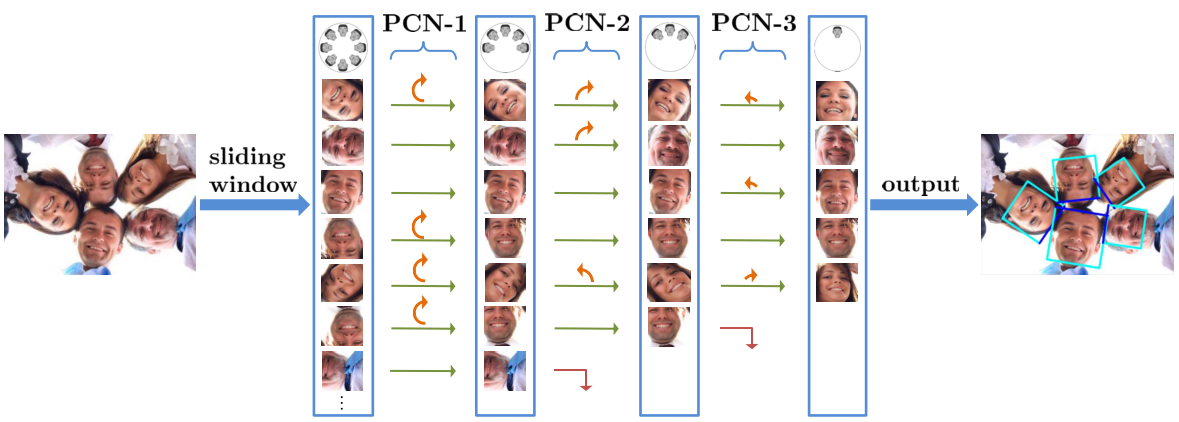
For each input window $x$, PCN-1 has three objectives: face or non-face classification, bounding box regression, and calibration, formulated as follows:
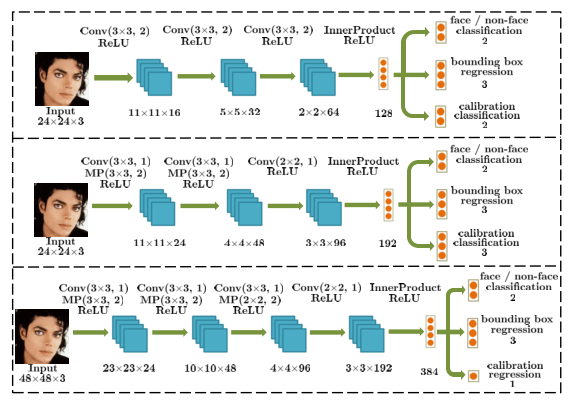
where $F_{1}$ is the detector in the first stage structured with a small CNN. The $f$ is face confidence score, $t$ is a vector representing the prediction of bounding box regression, and $g$ is orientation score. Overall, the objective for PCN-1 in the first stage is defined as:
where $\lambda{reg}$, $\lambda{cal}$ are parameters to balance different loss. The first objective, which is also the primary objective, aims for distinguishing faces from non-faces. The second objective attempts to regress the fine bounding box. The third objective aims to predict the coarse orientation of the face candidate in a binary classification manner, telling the candidate is facing up or facing down.
The PCN-1 can be used to filter all windows to get a small number of face candidates. For the remaining face candidates, firstly they are updated to the new regressed bounding boxes. Then the updated face candidates are rotated according to the predicted coarse RIP angles.
Similar as the PCN-1 in the first stage, the PCN-2 in the second stage further distinguishes the faces from non-faces more accurately, regresses the bounding boxes, and calibrates face candidates. Differently, the coarse orientation prediction in this stage is a ternary classification of the RIP angle range, telling the candidate is facing left, right or front.
After the second stage, all the face candidates are calibrated to an upright quarter of RIP angle range, i.e. [$-45^{\circ}$,$45^{\circ}$]. Therefore, the PCN-3 in the third stage can easily and accurately determine whether it is a face and regress the bounding box. Since the RIP angle has been reduced to a small range in previous stages, PCN-3 attempts to directly regress the precise RIP angles of face candidates instead of coarse orientations.
The early stages only predict coarse RIP ori- entations, which is robust to the large diversity and further benefits the prediction of successive stages.
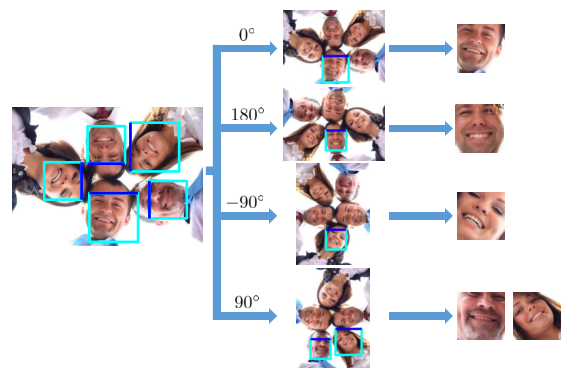
The calibration based on the coarse RIP prediction can be efficiently achieved via flipping original image three times, which brings almost no additional time cost. Rotating the original image by $-90^{\circ}$, $90^{\circ}$ and $180^{\circ}$ to get image-left, image-right, and image-down. And the windows with $0^{\circ}$,$-90^{\circ}$, $90^{\circ}$ and $180^{\circ}$ can be cropped from original image, image-left, image-right, and image-down respectively, as the following figure shows.

TITLE: Pelee: A Real-Time Object Detection System on Mobile Devicesn
AUTHOR: Robert J. Wang, Xiang Li, Shuang Ao, Charles X. Ling
ASSOCIATION: University ofWestern Ontario
FROM: arXiv:1804.06882
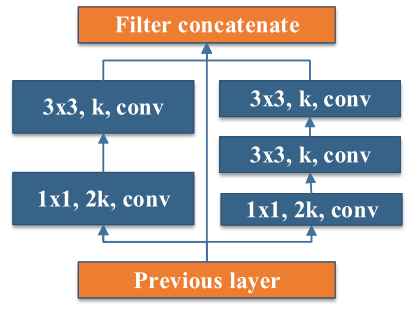
Two-Way Dense Layer. A 2-way dense layer is used to get different scales of receptive fields. One branch uses a small kernel size (3x3) to capture small-size objects. The other branch stacks two 3x3 convolution layers for larger objects. The structure is shown in the following figure.
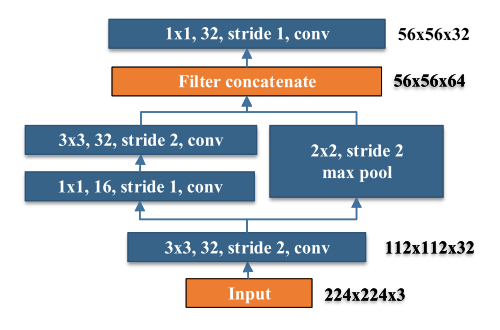
Stem Block. This block is placed before the first dense layer for the sake of cost efficiency. This stem block can effectively improve the feature expression ability without adding computational cost too much. The structure is shown as follows.
Dynamic Number of Channels in Bottleneck Layer. The number of channels in the bottleneck layer varies according to the input shape to make sure the number of output channels does not exceed the number of its input channels.
Transition Layer without Compression. experiments show that the compression factor proposed by DenseNet hurts the feature expression so that the number of output channels is kept the same as the number of input channels in transition layers.
Composite Function. The post-activation (Convolution - Batch Normalization - Relu) is used for speed acceleration. For post-activation, all batch normalization layers can be merged with convolution layer at the inference stage. To compensate for the negative impact on accuracy caused by this change, a shallow and wide network structure is designed. In addition, a 1x1 convolution layer is added to the last dense block to get a stronger representational ability.
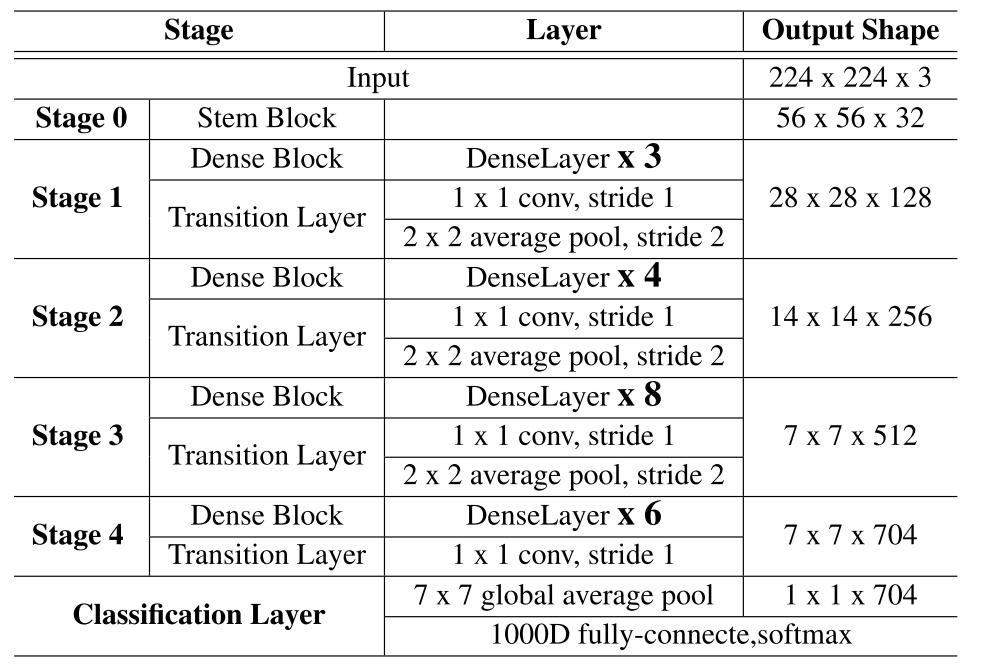
The framework of the work is illustrated in the following table.
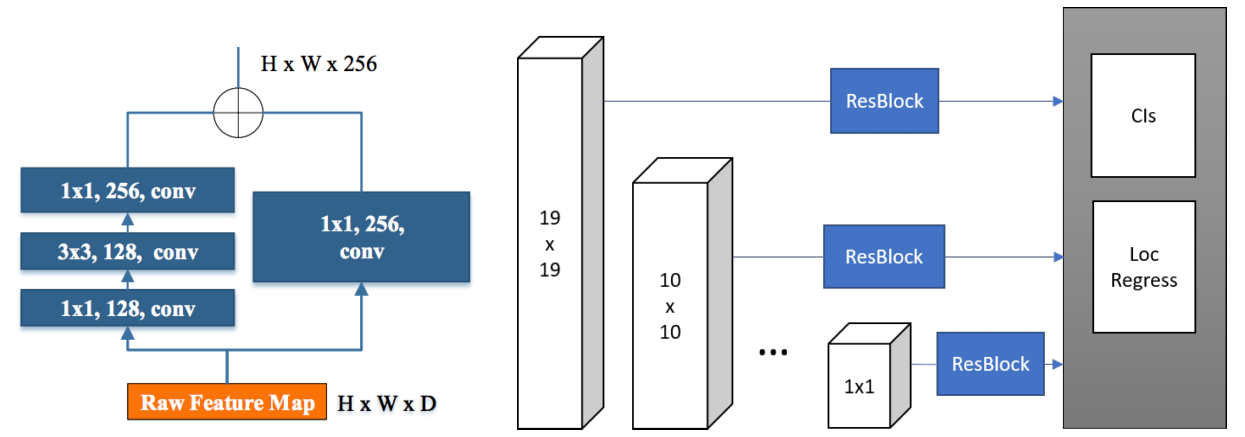
Feature Map Selection. 5 scale feature maps (19x19, 10x10, 5x5, 3x3, and 1x1) are selected. Larger resolution features are discarded for speed acceleration.
Residual Prediction Block. For each feature map used for detection, a residual block (ResBlock) is constructed before conducting prediction, shown in the following figure.
The classification performance on ILSVRC2012 is shown in the following table.

The detection performance on VOC2007 is shown in the following table.

The detection performance on COCO2015 is shown in the following table.

From my own experince, DW convolution is not pruning friendly so that recently pruning methods, such as ThiNet and Net-Trim, works poorly on DW convolution. This work uses conventional convolutional layers, so maybe those pruning methods can play a role.
最近在给封装一个动态库,需要支持古老的windows xp系统。而我的开发系统是windows 10,使用visual studio 2013作为IDE。
一通谷歌百度之后,我采用了曝光度最高的方法。具体来说包括两个步骤:
最初并没有发现这样做有什么问题,后来写了一个接口函数,release模式下没有发现问题,但是debug模式下调用该接口的函数在出栈时一直崩溃,错误如下

因为对这一块儿实在不熟悉,就抱着死马当活马医的态度,把所有MT/MTd都改成了MD/MDd,又把所有依赖库和自己的库编译了一遍。在目标测试机上安装,居然成功了。
在网上搜了一些解释:
Debug Assertion Failed! Expression: __acrt_first_block == header
As this is a DLL, the problem might lie in different heaps used for allocation and deallocation (try to build the library statically and check if that will work).
The problem is, that DLLs and templates do not agree together very well. In general, depending on the linkage of the MSVC runtime, it might be problem if the memory is allocated in the executable and deallocated in the DLL and vice versa (because they might have different heaps). And that can happen with templates very easily, for example: you push_back() to the vector inside the removeWhiteSpaces() in the DLL, so the vector memory is allocated inside the DLL. Then you use the output vector in the executable and once it gets out of scope, it is deallocated, but inside the executable whose heap doesn’t know anything about the heap it has been allocated from. Bang, you’re dead.
This can be worked-around if both DLL and the executable use the same heap. To ensure this, both the DLL and the executable must use the dynamic MSVC runtime - so make sure, that both link to the runtime dynamically, not statically. In particular, the exe should be compiled and linked with /MD[d] and the library with /LD[d] or /MD[d] as well, neither one with /MT[d]. Note that afterwards the computer which will be running the app will need the MSVC runtime library to run (for example, by installing “Visual C++ Redistributable” for the particular MSVC version).
You could get that work even with /MT, but that is more difficult - you would need to provide some interface which will allow the objects allocated in the DLL to be deallocated there as well. For example something like:
2
3
4
5
6
>void deallocVector(std::vector<std::string> &x) {
std::vector<std::string> tmp;
v.swap(tmp);
>}(however this does not work very well in all cases, as this needs to be called explicitly so it will not be called e.g. in case of exception - to solve this properly, you would need to provide some interface from the DLL, which will cover the vector under the hood and will take care about the proper RAII)
EDIT: the final solution was actually was to have all of the projects (the exe, dll and the entire googleTest project) built in Multi-threaded Debug DLL (/MDd) (the GoogleTest projects are built in Multi-threaded debug(/MTd) by default)
说实话,对计算机原理的理解十分欠缺,遇到稍微专业一些的问题只能照着网上的一些方法试一试,如果成了也就不会再深入研究了,如果不成也不知道为什么不成,只能再去试别的方法。:-(
I’ve been using VSCode for a while and used to Markdown, which has not been supported by EverNote yet. Thus, I wonder whether there’s any extension that can help. Luckily, evermonkey shows up.
There are 3 steps to use this extension.
evermonkey.token and evermonkey.noteStoreUrl in settings.Open command panel by F1 or ctrl+shift+p then type
ever new to start a new blank note.ever open to open a note in a tree-like structure.ever search to search note in EverNote grammar.ever publish to publish current editing note to EverNote server.ever sync to synchronizing EverNote account.Currently, third-party extensions only support synchronizing files. The file can not be modified in apps. For example, I can now only modify the file in VSCODE, but not in EverNote application.
list the different files in two branches
1 | git diff branch1 branch2 --stat |
list the differences in detail in two branches
1 | git diff branch1 branch2 |
Relpace one file from branch1 to branch2
1 | git checkout branch2 |
Start a new branch1
1 | git checkout -b NewBranch |
List branches in remote git
1 | git branch -a |
TITLE: MobileNetV2: Inverted Residuals and Linear Bottlenecks
AUTHOR: Mark Sandler, Andrew Howard, Menglong Zhu, Andrey Zhmoginov, Liang-Chieh Chen
ASSOCIATION: Google
FROM: arXiv:1801.04381
Depthwise Separable Convolutions. The basic idea is to replace a full convolutional operator with a factorized version that splits convolution into two separate layers. The first layer is called a depthwise convolution, it performs lightweight filtering by applying a single convolutional filter per input channel. The second layer is a $1 \times 1$ convolution, called a pointwise convolution, which is responsible for building new features through computing linear combinations of the input channels.
Linear Bottlenecks Consider. It has been long assumed that manifolds of interest in neural networks could be embedded in low-dimensional subspaces. Two properties are indicative of the requirement that the manifold of interest should lie in a low-dimensional subspace of the higher-dimensional activation space:
Assuming the manifold of interest is low-dimensional we can capture this by inserting linear bottleneck layers into the convolutional blocks.
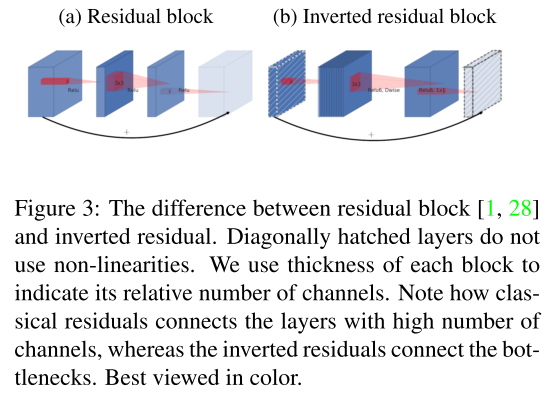
Inverted Residuals. Inspired by the intuition that the bottlenecks actually contain all the necessary information, while an expansion layer acts merely as an implementation detail that accompanies a non-linear transformation of the tensor, shortcuts are used directly between the bottlenecks. In residual networks the bottleneck layers are treated as low-dimensional supplements
to high-dimensional “information” tensors.
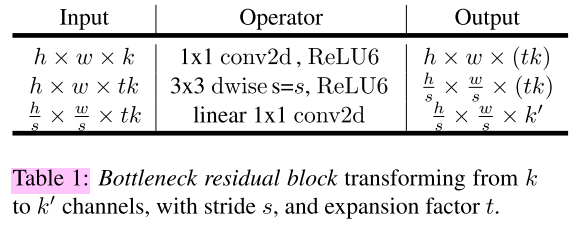
The following figure gives the Inverted resicual block. The diagonally hatched texture indicates layers that do not contain non-linearities. It provides a natural separation between the input/output domains of the building blocks (bottleneck layers), and the layer transformation – that is a non-linear function that converts input to the output. The former can be seen as the capacity of the network at each layer, whereas the latter as the expressiveness.
The framework of the work is illustrated in the following figure. The main idea of this work is to learn image aesthetic classification and vision-to-language generation using a multi-task framework.
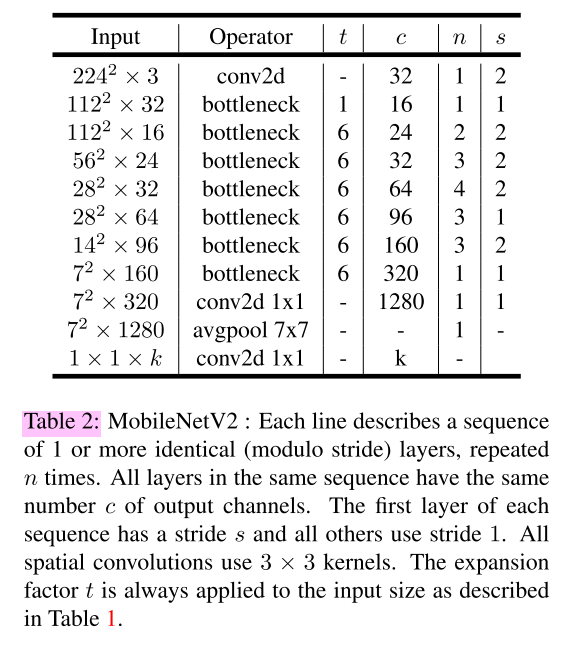
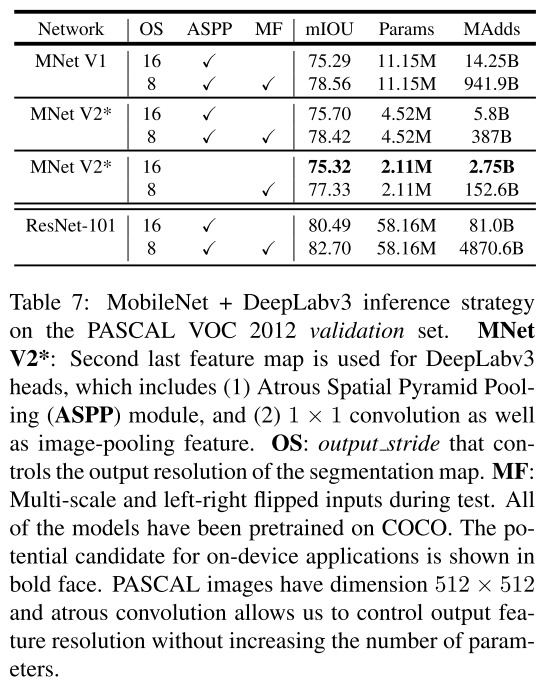
And the following table gives the basic implementation structure.
TITLE: Tiny SSD: Neural Aesthetic Image Reviewer
AUTHOR: WenshanWang, Su Yang, Weishan Zhang, Jiulong Zhang
ASSOCIATION: Fudan University, China University of Petroleum, Xi’an University of Technology
FROM: arXiv:1802.10240
The framework of the work is illustrated in the following figure. The main idea of this work is to learn image aesthetic classification and vision-to-language generation using a multi-task framework.
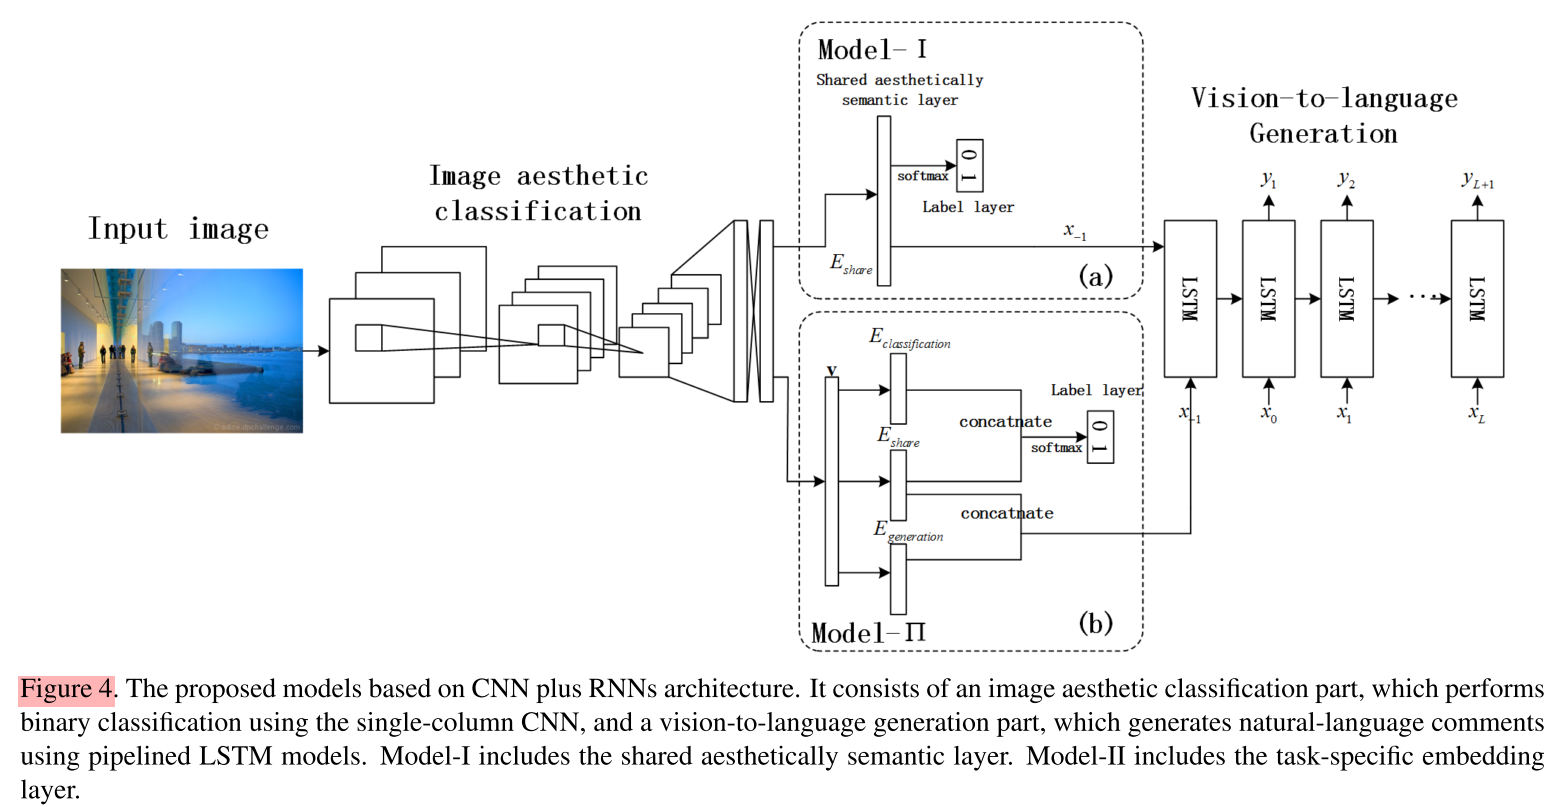
The authors tried two designs, Model-I and Model-II. The difference between the two architectures is whether there are task-specific embedding layers for each task in addition to the shared layers. The potential limitation of Model-I is that some task-specific features can not be captured by the shared aesthetically semantic layer. Thus a task-specific embedding layer is introduced.
For image aesthetic classification part, it is a typical binary classification task. For comment generation part, LSTM is applied, the input of which is the high-level visual feature vector for an image.

自从出来创业,自己一直处于一种颇为混乱的状态。包括如何管理团队、如何保持自己的技术能力、如何释放压力及平衡生活和工作……也许在最近的未来,我依旧无法找到令人满意的答案,但至少从现在开始我要努力去寻找答案。
有一句话“有一种迷茫叫想得太多,做得太少”,的确如此,当自己在不断审视自己的时候,不知道该如何是好的时候,其实就是该行动的时候了。比如我最近读文献读得少了,总是焦虑要和技术脱轨跟不上形势,其实不如赶紧补一补课,多读一读最近发表的论文。同样的,为了缓解其他方面的焦虑,我也要开始多读读书,给自己充电。这本《极简主义》就是一个开头。
很多事情都是复杂的,而且大多数情况下我们都在寻找复杂的解决方案,但其实越简单的方案越有可行性,也越可能正确。反思一下自己,好像从读硕士阶段开始,就在想象自己应该做一些复杂的事情,比如复杂的算法、复杂的代码、复杂的系统……其实真正解决问题的方案都没有那么复杂。书中给出的建议是:
“事情其实很简单”的基本要求是我们要用简单的方法提问和解答,同时寻求别人的简单回答和问题。
如果你不知道自己要驶向哪个港口,那么无论是东南风还是西北风,对你来说都是无所谓的。
感觉这一理念和“事情其实很简单”是相辅相成的,即当我们可以将问题和答案简化的时候,也就距离“明白自己要做什么”不远了。其实最简单的“弄明白自己要做什么”的方法就是制定计划。将我们所要达到的目标形象化,设定一件事情结束的指标,即当我们要知道一件事做到什么程度的时候就可以算作是结束了。
我们除了要知道自己想做什么,更重要的两个问题是:
对于第一个问题,我们除了要知道自己要做什么,还需要知道做这件事背后的原因。我们需要问自己:“这个工作最终要达到什么目标?”。
对于第二个问题,我们要思考的是如何让所有利益相关者获利,即共赢。让利益相关者永远开心是成功的关键,我们需要告知利益相关者他们会得到什么,而他们得到的一定是他们需要的。
我最初在读到这个标题的时候,以为是说任何事情都有“惯性”,它会影响其他事情。但后来发现,原来这里说的是要有计划的开展工作,一件事情的完成是一个一个连续的小事件组成的。
为了能够让事情连续起来,我们需要作出一些努力,包括
这些努力是一种递进的关系,核心就是“做好计划”。什么是好的计划呢?答案是详细周到的计划。而如何做到详细周到,首先,我们需要能够清晰地给出目标,这其实就是理念二对我们的要求。其次,在制定计划的时候,很多东西肯定不是马上就能遇到的,我们需要作出预判,预判的根据就是已有的知识假设以及各个事件之间的因果关系。最后,就是记录以往的经验,这些经验讲转化为4和5中的知识。
书中有一个情节让我十分感同身受——那就是“救火”。书中是这样描述的:
早餐你到达办公室后翻看了代办清单。当你开始做清单上的第一件事情时有人通知你参加九点三十分的会议。在开会期间有人敲门找你,说“我能耽误你几分钟吗?”就在你和他谈话的时候,你的手机响了,于是你又得接电话。还没接完电话呢,电脑“叮”地响了一声提醒你收到了一封邮件。紧接着你的座机又响了……
真的是这样,感觉在创业的半年多来,很多时候我被这个同事叫过去,然后又被那个实习生拦住,接着处理杂事……以后要注意制定计划,然后跟住这个计划。
首先重要的事情说三遍:开始做!开始做!开始做!
开始做的前提是应用好第二和第三个理念,然后就是如何做,书中给出工具包括
第一个工具是说任何一件工作都应该有负责人,不应出现这个工作你做也行我做也行的情况。具体的一项工作可能是属于一个团队的,但是这个工作一定由一个人负责。而且一项工作一定可以被拆分到团队中的每个人头上。
第二个工具其实是一个估算工作量的工具。当我们发现工作量完全超过了我们可以承受的范围时,我们就要对工作进行优先级的排序,并适当地放弃一些工作。想起来一句大家常说的话:舍得舍得,有舍才有得。如何建立优先级,又回到了理念一、二、三的问题。读这一本书的感觉就是,事情都是螺旋上升的,计划一件工作,或者学习这本书中的知识,也需要循环使用这些工具才能到达目标。
第三个工具是一种如何最大化员工输出的方法。人员可以被分为五类:
计划做的再好,也开始执行了,总会有一些事情是不受控制的,总有一些“惊喜“要来突袭我们,那我们该如何处理这些事情呢?
第一个工具是指我们事先就会预测到一些问题,我们需要做的是计划好如果真的发生了问题,我们要怎么做。
第二个工具要求我们队可能发生的问题进行评估,包括发生的概率和带来的破坏力,这样可以帮助我们尽量避免一些严重的问题,所谓“两害相权取其轻”。
其实我的理解是要做好完备的计划,即在应用第二个理念时,就要考虑到可能遇到的问题。对于项目管理来说,这些风险可能是需要经验积累才能预见到的,需要不断的实践和总结。
一旦我们践行了理念一理念五,做一件事情的基本框架就搭建完成了,但是还有一些细节需要注意。该理念就是告诉我们在实践计划的过程中,每个工作只能有两个状态:要么完成了,要么没有完成。如何判定完成或者没有完成呢,需要我们“明确界定事情的结果”。
其实如果我们已经开始施行理念三,那么我们就已经开始理念六了,因为我们把达到一个目标分解成了一个个的小工作,当我们完成这些小工作之前,目标就是没有完成。但是,有了这些小工作,我们可以有效的监控大目标已经完成了多少。至于如何评估一个小工作是否完成,我们可以进一步借助理念二,我们到底要做什么。每项细化的工作都应该明确工作目标和成果形式,确定一些我们能实实在在看到并能够掌控的东西,通过对成果的检验,我们可以判断一件工作是否完成了。
这里作者给出了两个工具:
首先,当你与任何层次的人打交道遇到挫折时,能够尽量把自己放在他们的位置上考虑,会更容易理解其观点和做法。这个其实就是经常会被提到的“体恤下属”和“站在领导的角度看问题”,其实这两件事说起来容易,做起来难度很大。对于前者,当我们有责任有压力在身时,很难做到冷静地处理问题。至于后者,当我们的眼界还不够的时候,几乎不可能具有那样的眼光,或者有时候是“不在其职不谋其政”。
其次,让所有人都有所得,而且是让每个人得到他自己想要的,而不是我们想给的,才能让所有人顺畅地合作。